Create Flexible Climes with Smart Herb Spirals
- Jon Mychal Heatherly
- May 7, 2021
- 4 min read
Updated: Jun 30, 2024
Learn to companion plant herbs by constructing an herb spiral with upcycled materials
Original Source: jmheatherly.medium.com

Photo by Terra Incognita
Variety is the spice of life, and a variety of spices is even better. Are you a gardener or chef who wants a steady supply of freshly-grown herbs and seasonings? Try building an herb spiral in your backyard or shared space.
Popular in permaculture design, these herb spiral gardens provide over 50 feet of running herbs — likely more than enough for your neighbors, too. A researcher and professor named Bill Mollison developed the concept of permaculture by studying indigenous practices.
As the son of a Tasmanian fisherman, Mollison grew up close to nature. He was an esteemed biologist and environmentalist who researched with organizations like Australia’s Commonwealth Scientific and Industrial Research Organisation (CSIRO).
Mollison founded The Permaculture Institute in Tasmania. He dedicated his life to developing philosophies and techniques towards a more “permanent agriculture” in line with the natural world — rather than against it. He defined permaculture as:
“The conscious design and maintenance of agriculturally productive systems which have the diversity, stability, and resilience of natural ecosystems. It is the harmonious integration of the landscape with people providing their food, energy, shelter and other material and non-material needs in a sustainable way.”

Photo by Terra Incognita
To live more harmoniously with our environment, let’s start by building an herb spiral! This practice incorporates several variables in the design to offer multiple “microclimates.” The center gets the most sun and drains the best — ideal for Mediterranean herbs like oregano or rosemary. The east side receives gentle morning sunlight, which delicate plants like parsley and chives love.
Sun-lovers like lavender and sage grow well on the sunny southwest section and place moisture-loving plants like dill and cilantro on the north side. Water chestnut or mint thrives in designs containing a small pond. Plant lemon balm or citronella by your pond to deter mosquitoes. Watch this video as Mollison breaks down how to build an herb spiral:
Bill Mollison explains herb spirals.
You’ll need a few things to start building your herb spiral! First, find which space to grow it. Mollison recommends a diameter of 6 feet adjacent to your kitchen. You can adjust the size based on what ground is available.
Incorporating elements of industrial psychology, he urges you to plan your herb spiral as close to where you cook as possible. Mollison recommends the night slippers rule. If you wear your night slippers to the herb spiral and get wet, it is too far away.
Next, gather whatever tools and materials you may need. The retaining wall of the spiral needs to be sturdy. Found or reclaimed resources work well — such as brick, stones, concrete chunks, wood, or even bottles. Rocks or gravel, soil compost, shovels, herbs, straw, and amendments could be useful. Now we may begin.
Step 1:
Clear out your plot of debris and competing plants. Some people like a water pond at the outermost point of their spiral — on the north side. If you incorporate this into your plans, dig the hole and place the liner or plastic bin now. Cover the hole with a wooden board while you continue.

Photo by klemen cerkovnik
Step 2:
Starting from the center, layout your retaining wall in a spiral. In the Northern Hemisphere, your spiral should run clockwise, with its shortest point ending on the north side of the mound. Reverse this if you live in the Southern Hemisphere. Build up center walls higher than outer walls — up to 3 feet. Once you see your layout, begin placing bricks or large stones.
Step 3:
Fill in with soil a bit to add support for higher retaining walls in the center. Your center area and the ring around should be filled with rubble like broken cement pieces or stones. Mix sand and soil to fill the ring between the center and outer wall.
Add your sandiest mix on top of the rubble in the center. You do this because you want your spiral drier towards the middle and wetter towards the perimeter - thus creating different microclimates across your herb spiral.

Photo by klemen cerkovnik
Step 4:
Remove the wooden board and place stones in your pond if you have one. Fill the reservoir with water. Now plant your herbs and give them an excellent first watering.
Permaculture sounds complicated, but it doesn’t have to be. Tending an herb spiral garden provides tranquility, fragrant aromas, and delicious flavors in a relatively small space. This design produces more than enough to share, and it makes for a great daily ritual — especially if you put it near the kitchen. Once set up, herb spirals don’t require much effort to maintain beyond watering and weeding. Create one in your backyard or community garden today!

Photo by Mira Drozdowski
More Info
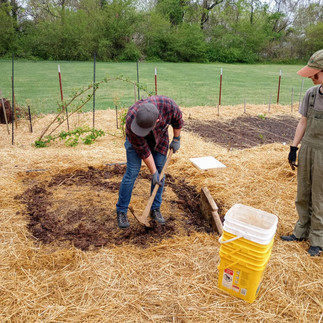
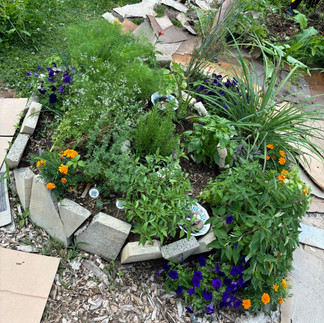
Here are some photos of us building our herb spiral at Murfreesboro Community Garden in April 2022.


Comments